A butt joint is one of the most common techniques in woodworking and construction. Learn what a butt joint is, its pros and cons, and how to make a strong butt joint with step-by-step instructions and tips.
What Is a Butt Joint?

A butt joint is the simplest form of woodworking joint, where the end of one piece of wood is placed against another piece, typically at a 90-degree angle, and secured using adhesives, nails, or screws. This method does not involve any special cuts or shaping, making it straightforward but inherently weaker than more complex joints due to the limited surface area for bonding and the reliance on end-grain connections.
Key Characteristics
|
Feature |
Description |
|
Ease of Construction |
Simple and quick to assemble |
|
Joint Strength |
Weak without reinforcement |
|
Versatility |
Used in woodworking, metal fabrication, and construction |
Butt Joint Advantages and Disadvantages

Advantages
✅ Easy to Make: Easy to create without specialized tools or techniques.
✅ Efficient Material Usage: No need for complex cuts or excess trimming.
✅ Versatile Application: Works with wood, metal, and plastic materials.
✅ Quick Assembly: Can be glued, nailed, screwed, or welded in minutes. Ideal for basic constructions.
Disadvantages
❌ Weak Structural Integrity: Lacks interlocking features, making it prone to breaking.
❌ Poor Aesthetic Finish: The seam is visible, requiring additional finishing.
❌ Limited Load-Bearing Capacity: Cannot withstand significant stress unless reinforced.
❌ Reliant on Fasteners or Glue: Needs additional support to ensure stability.
When to Use Butt Joints?
Despite its structural limitations, a butt joint is widely used in various applications where quick assembly and simple connections are sufficient.
Framing and Construction

Connecting wall studs to top and bottom plates in construction projects. Used in partition walls and simple frameworks where strength isn't a primary concern. Ideal for setups that don’t require long-term durability, such as scaffolding or event structures.
Cabinetry and Basic Furniture Making

Commonly used in cabinet construction, especially for assembling drawers, shelves, and furniture frames. Suitable for simple tables, chairs, and storage units where strength is not a primary factor. Often reinforced with screws, glue, or additional fasteners to improve durability.
DIY Woodworking Projects

A preferred method for quick and simple home woodworking projects such as picture frames, storage crates, and small utility shelves. Offers an easy way to join wood pieces without requiring advanced tools or techniques. Works well for projects where aesthetics and high structural integrity are not top priorities.
Metal Fabrication and Welding
Frequently used in pipe welding and structural metalwork where welded seams provide additional reinforcement. Common in automotive, industrial, and construction applications for assembling frames, enclosures, and support structures. More effective in metalworking than woodworking due to the strength welding can provide.
Temporary Structures
Ideal for building temporary setups such as event staging, exhibition booths, and trade show displays. Often used in quick-assembly structures that need to be dismantled or replaced frequently, such as scaffolding and mobile workstations. Provides an efficient and cost-effective solution for short-term applications.
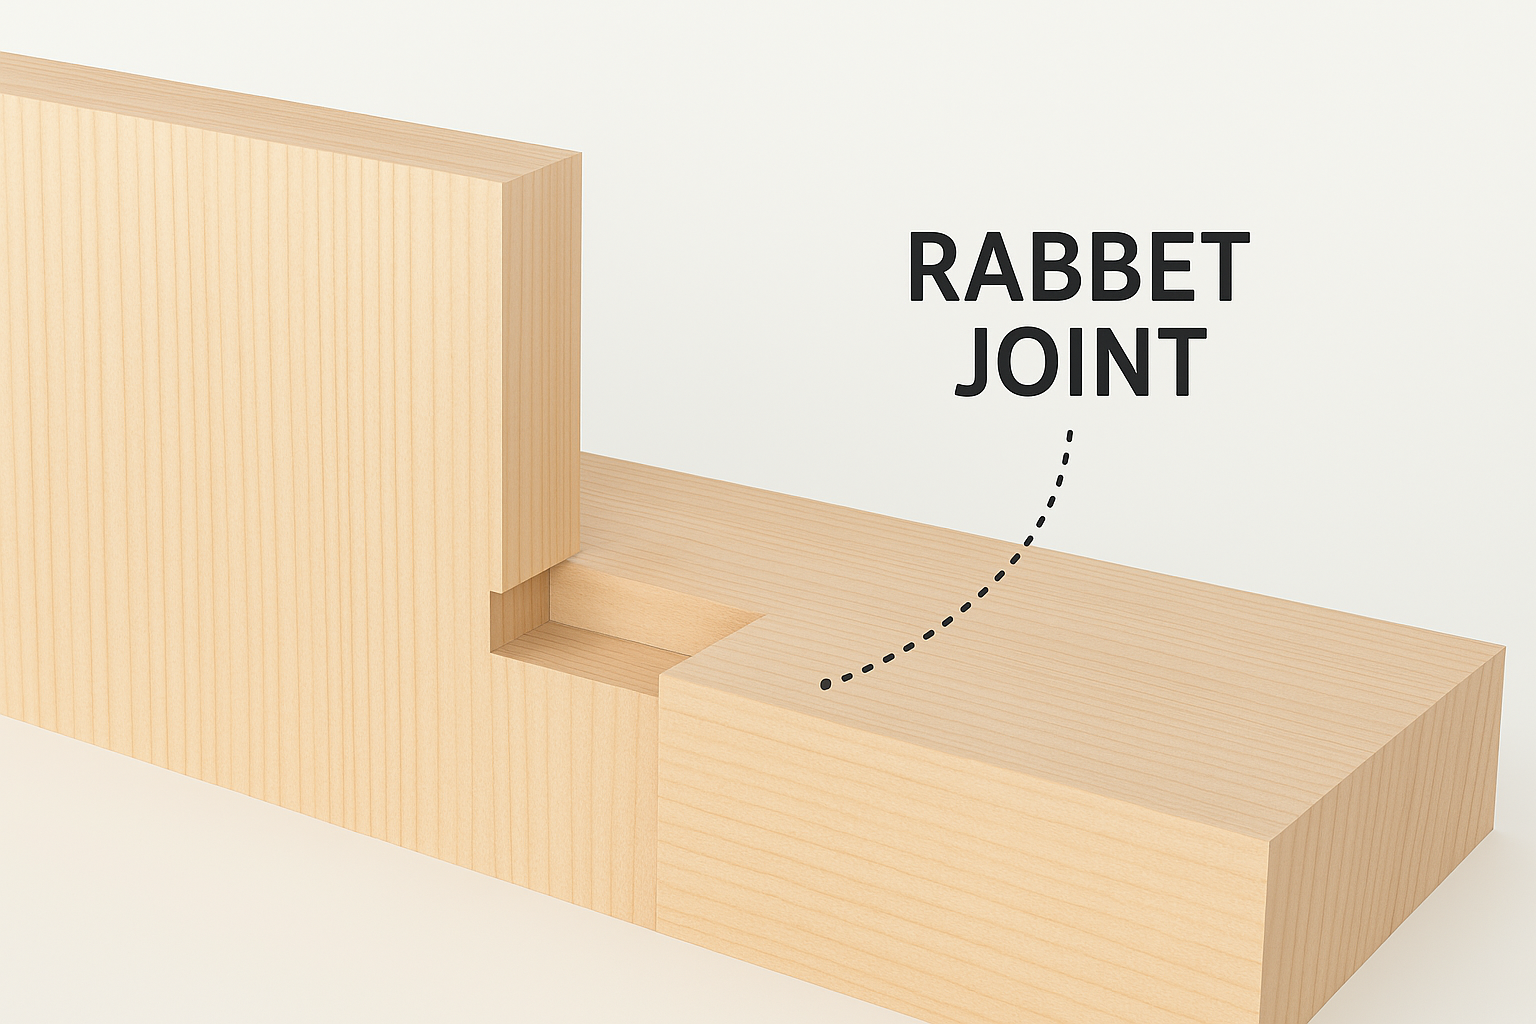
While butt joints offer simplicity and speed, they may lack the strength required for high-stress applications. In such cases, alternative joints like dovetail, mortise and tenon, or lap joints are more suitable due to their enhanced structural integrity.
How to Make Butt Joints?
Creating a butt joint is a straightforward process, but ensuring precision and proper reinforcement can significantly improve its strength and durability. Whether you're working with wood, metal, or plastic, the process involves accurate measuring, secure positioning, and applying the right fastening techniques for a stable connection.
Materials & Tools
-
Wood, metal, or plastic pieces: depending on the project
-
Saw: circular saw, table saw, or handsaw for wood; metal saw for metal
-
Fasteners: nails, screws, or glue for wood; welding tools for metal
-
Clamps: used to hold the pieces steady during assembly to ensure precision and prevent movement
-
Reinforcements (Optional): dowels, biscuits, pocket screws, or corner brackets
Step-by-Step Guide to Making a Butt Joint

Step 1. Measure and Mark
Begin by measuring and marking the exact position where the two pieces of wood will join. Use a square to ensure straight, precise lines and proper alignment.
Step 2. Cut the Wood
Use a saw to cut the wood to the required size. Ensure that both ends are cut at 90 degrees for a tight and flush connection. Uneven or angled cuts will weaken the joint.
Step 3. Prepare the Joint

Sand the cut edges lightly to remove splinters and create a smoother bonding surface. If using screws, drill pilot holes to prevent the wood from splitting when fasteners are inserted.
Step 4. Apply Wood Glue
Spread a thin, even layer of wood glue along the joining surface. Wood glue significantly increases the joint's holding power when dried.
Step 5. Clamp the Pieces Together

Position the two pieces together and use clamps to hold them securely while the glue sets. Ensure they are perfectly aligned before proceeding.
Step 6. Reinforce with Fasteners
Drive screws or nails into the joint for added strength. If using screws, space them evenly and ensure they penetrate deep enough into the second piece without breaking through.
Step 7. Let the Joint Cure
Allow the glue to dry fully before removing the clamps. Drying time varies depending on the type of glue used but typically takes a few hours.
Step 8. Finishing Touches
Sand the joint area to smooth out any glue residue or uneven surfaces. If desired, paint or apply a finish to protect the wood and improve aesthetics.
Reinforcement Techniques for Stronger Butt Joints
Since the basic butt joint relies on a weak end-grain connection, relying solely on glue is rarely sufficient for load-bearing projects. Integrating one of these reinforcement methods can significantly increase structural integrity and longevity.
1. Pocket Hole Joinery
Currently the most popular method for DIYers, this technique uses a jig to drill an angled hole into one piece. A screw is then driven across the joint into the long grain of the mating piece, creating a clamp-like force that is far stronger than standard screwing.
-
Best For: Cabinet carcasses, face frames, and table aprons where the holes can be hidden.
2. Wooden Dowels
Dowels serve as internal skeletons. By drilling matching holes in both workpieces and inserting a glued wooden peg, you increase the gluing surface area and provide excellent resistance against shearing forces.
-
Best For: Chairs, visible furniture legs, and projects where you want a clean surface with no visible metal fasteners.
3. Splines or Wood Keys
A spline is a thin strip of wood glued into a slot cut across the joint (often seen on the corners of picture frames). This technique turns a weak corner into a decorative feature and dramatically increases the bonding surface.
-
Best For: Picture frames, small boxes, and mitered butt joints.
4. Biscuit Joinery
This involves cutting crescent-shaped slots to insert a compressed wooden "biscuit." While often confused with structural reinforcement, biscuits are primarily designed to keep boards perfectly flush during gluing rather than adding massive load-bearing strength.
-
Best For: Edge-to-edge gluing (like table tops) to keep surfaces flat.
5. Triangular Glue Blocks
A traditional cabinetmaker’s trick, this involves gluing a triangular block of wood into the inside corner of the joint. It acts as a physical brace to prevent the joint from "racking" (wobbling) and doubles the glue surface.
-
Best For: Reinforcing baseboards, drawer bottoms, and the interiors of cabinets where the block won't be seen.
Quick Comparison: Which Butt Joint Reinforcement is Right for You?
|
Method |
Strength |
Difficulty |
Best Used For |
|
Pocket Holes |
⭐⭐⭐⭐ |
Low |
Cabinets, Frames |
|
Dowels |
⭐⭐⭐⭐⭐ |
High |
Fine Furniture |
|
Biscuits |
⭐⭐ |
Medium |
Panel Alignment |
|
Splines |
⭐⭐⭐ |
Medium |
Boxes, Picture Frames |
|
Glue Blocks |
⭐⭐⭐ |
Low |
Interior Reinforcement |
Common Butt Joint Mistakes and How to Avoid Them
Even simple butt joints can fail if basic principles are ignored. Watch out for these common pitfalls to ensure a professional and durable result.
Inaccurate 90° Cuts Leading to Gaps
Even a slight deviation from a true 90° cut will create visible gaps and reduce bonding strength.
Tips: Make sure your markings are perfectly square, keep your saw aligned with a stable fence, and always check the finished cut with a try square before moving on.
Trusting "Factory Edges" to Be Square
The ends of store-bought lumber are rarely perfectly square, leading to unsightly gaps that prevent a tight butt joint connection.
Tips: Never assume a board is ready to use right off the shelf. Always trim a small amount off the end with your own saw to guarantee a perfect 90-degree angle.
Parts Sliding Out of Alignment When Clamped
Wet glue acts like a lubricant, causing the two pieces of a butt joint to drift out of position as soon as clamp pressure is applied.
Tips: Sprinkle a tiny pinch of table salt on the glued surface before clamping. The salt grains bite into the wood fibers to lock the joint in place without affecting bond strength.
Splitting the Wood with Improper Fastening
Driving screws too close to the edge or into the end grain without preparation forces the fibers apart, causing cracks that ruin the butt joint.
Tips: Always drill a pilot hole slightly smaller than your screw shank. Use a countersink bit so the screw head sits flush without acting like a wedge that splits the wood.
Weak Bonding Due to End Grain Absorption
The porous end grain acts like a straw and sucks up adhesive, leaving the butt joint dry and prone to failure.
Tips: "Size" the joint by applying a thin layer of glue and letting it soak in for two minutes to seal the fibers. Then, apply a fresh layer just before assembling.
Conclusion
A butt joint is a beginner-friendly and versatile method for joining materials, though it lacks inherent strength without reinforcements. Whether used in woodworking, construction, or metal fabrication, knowing when and how to apply it properly can ensure a durable and functional result. If strength is a priority, consider adding reinforcements or exploring alternative joint options.